
The Tesla wall connector is Tesla’s proprietary and recommended charger for the Tesla electric vehicle, and it works quite well most of the time.
One nice feature of the Tesla wall connector is that it can be connected to a local WIFI network to enable it receive over-the-air firmware updates (for improved user experience and introduction of new features), usage data tracking capability, and remote diagnostics access.
But there are occasions where the wall connector just won’t connect to WIFI either during initial setup or later during your use of the charger.
In this article, I will be providing tested and proven solutions to Tesla wall connector not connecting to WIFI.
Why Won’t My Tesla Wall Connector Connect To WIFI
Before going into providing possible reasons and fixes for Tesla wall connector not connecting to WIFI, I think that it is important to first provide details on how to connect the wall connector to WIFI in the first place.
I always take this approach because if you are not getting the setup process right, then other troubleshooting processes will be of no use.
So, here’s how to set up the Tesla wall charger to connect to WIFI:
- Make sure that your wall connector is unplugged from your vehicle before starting the connection process, and do not plug it into the vehicle throughout the process
- Go to the circuit breaker that the wall connector is connected to, and turn it off for 5 seconds. If you cannot reach the circuit breaker to turn it off, then press and hold the cable handle button for five seconds. This will make the wall connector to start broadcasting its WIFI signal. Only release the button when all the lights have turned on.
- Note the size (amps) of the circuit breaker
- Make sure that you are standing next to the wall connector at this point, and remain in that close proximity all through this setup process.
- After completing step 2 above, you will see a blinking green LED indicator on the connector, and the connector will broadcast its SSID for up to 15 minutes.
- So, head over to your phone and search for available WIFI networks. Find the Tesla wall connector WIFI name. It should be in the format TeslaWallConnector_XXXXX, where XXXXX is a unique ID number
- Now, tap on this network and enter the WIFI password for the wall connector. You will find the password on the front of the product’s quickstart guide as WPA2. But, if you have already connected to this network in the past, you are unlikely to be prompted to enter the password again at this stage.
If you have lost the password and the quickstart guide, get help using this link
- If, at this point, you see Connected, No Internet Connection on your phone for the Tesla wall connector network, this is not a problem. Proceed to the next steps.
If your phone keeps reconnecting to your home WIFI router at this stage, then put your phone in airplane mode and turn only WIFI on.
- Make sure that you remain connected to the TeslaWallConnector network. Scan the QR code with your phone camera or open your phone browser and go to this address http://192.168.92.1/installation
I have recommended that you add /installation to the IP address URL because the page may not load fully if you only enter http://192.168.92.1
- Please note that you must use a browser like Chrome, Firefox, Edge, Safari, etc., for this, and not a search engine app like Google Search app.
- Once the installation page loads, select your country of residence and select the size of the circuit breaker that your Tesla wall connector is installed on, and then click on Save.
Now comes the part where you connect the wall connector to your WIFI router
- After tapping Save in step 11 above, you should be redirected to the front page of the setup wizard on the browser. Click on WIFI.
If the front page does not load properly, enter this URL instead http://192.168.92.1/wifi
- When the page opens, it should list your local WIFI network and prompt you to enter the password. If your network does not appear, click on Rescan
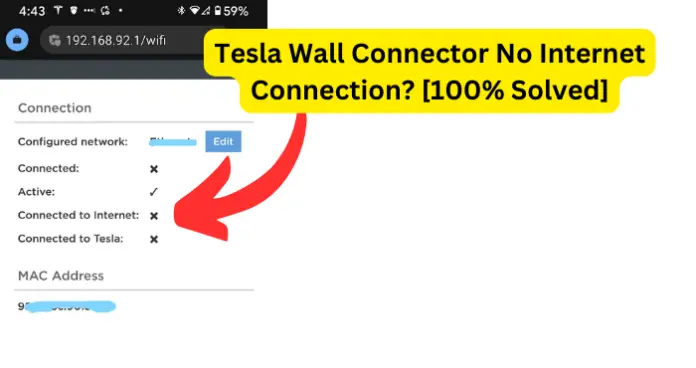
- Enter the password and connect. Once successful, your WIFI details will be displayed. You should see checkmarks next to ‘Connected to Tesla’ and ‘Connected to Internet’
Now, you have connected Tesla Wall Connector successfully to WIFI and internet.
Still having issues? Try the fixes below.
Note: you may also experience your Tesla not connecting to Wifi, here’s what to do if you’re experiencing that.
1. Your WIFI Router Does Not Have The Recommended Settings
The primary reason why users have connectivity issues with Tesla wall connector is that the WIFI router they are using does not have the correct parameters for the connection to work.
So, here are the correct parameters that need be in place on your WIFI router:
- Frequency of 2.4GHz only – Tesla wall connector only supports 2.4GHz frequency routers. If you have a router that supports 5GHz, it should also support 2.4GHz. So, make sure to switch to 2.4GHz frequency before connecting the wall connector to WIFI.
If you use a 5GHz frequency, you may not see your WIFI network on the setup page or you may not see the checkmark next to Connected To Internet
- WPA2 Security Protocol only – Tesla wall connector only supports WPA2 security key protocol. If your WIFI uses WPA3 or you are on a shared network, this connection will not work, and you are likely to see No Internet Connection error
- No Mac Address and Content Filtering – If you have Mac Address or Content Filtering enabled on your WIFi router, the Tesla wall connector will not connect successfully. So, make sure that these settings are not enabled on your router.
Fix – Make The Right Settings On Your Router
You can contact your internet service provider to confirm frequency, security protocol and filtering settings on your router, and get help from them if you need to make changes.
If you are using a mesh network, for example, it is likely to be using WPA3 protocol and this will not work. You may have to create a guest network and assign WPA2 to it instead.
Check WIFI Frequency and Protocol
- Connect to your WIFI on your PC
- Right-click on it and select Properties
- On the properties page, you will see the WIFi frequency and the security protocol in use.
Change WIFI Frequency
The method to change WIFi frequency on your router depends on the brand you are using. This is why I suggest that you contact your ISP to help you with this process. However, the general process is the same, so I will be using a dual-band TP-Link router in this example:
- Log into the router using the IP address on the manual and the credentials
- Click on Advanced, then click on Wireless
- Next, click on Wireless Settings
- Then, click on 2.4GHz at the top right of the screen and make the necessary changes as described in this page
Change The Security Protocol
The method to change the security protocol to WPA2 is similar to that of changing the frequency.
Simply,
- Log into the router
- Click on Wireless
- Click on Security
- Then select WPA2 as the protocol if it is set to any other value.
2. There Is No Internet Connection On The Router
Another reason why you may see No Internet Connection on the Tesla wall charger, or the wall charger won’t connect to the WIFI at all, is because there is actually no internet connection on the router.
If you have followed all the steps outlined in this article to set up the wall charger connectivity, and you have all the prerequisites in place, then i have found that the most common cause of connectivity issues is that there is no internet on the router. This is usuall due to:
- A network issue from your ISP
- A temporary glitch on the router
- You have no active internet subscription on the router
Either of these can cause the connectivity issues on the wall charger and you have to trace the root cause following the steps below:
Fix 1 – Restart the router
The first step to take in resolving this issue is to restart the router. If the internet connectivity problem is caused by a glitch on the router, restarting it will usually solve the problem.
Fix 2 – Confirm but you have an active internet subscription
It is possible that your subscription may have expired or that you have exhausted the data quota on your subscription. Either way, confirm that you have an active internet subscription and then try again
Fix 3 – Contact your ISP
If, after restarting the router and making sure that you have an internet subscription, the issue persists, then it is likely that the problem maybe with your internet service provider.
One way to confirm this is to connect to the same Wi-Fi network using your phone or computer. If there still isn’t any internet connectivity on the device, then contact your ISP.
3. Poor WIFI Signal
Poor Wi-Fi signal is another culprit when it comes to connectivity issues on a Tesla wall charger.
If the wall charger does not receive strong signals from your Wi-Fi router, you will experience issues like No Internet Connection or the wall charger will simply not connect.
Fix – Place the router closer to the wall charger
Bring the Wi-Fi router as close to the wall charger as possible. Remember that the Tesla wall charger only supports 2.4 GHz. And the range of a 2.4 GHz frequency water is 150 feet indoors.
4. No Internet Connection Message May Be OK
When setting up the wall connector, you may see the message “No Internet Connection” when you connect your phone to the Tesla wall connector network name TeslaWallConnector_XXXXX. This is expected and is not a problem.
That is, if you are at number 5 in the setup process detailed above, and you see “No Internet Connection” after selecting the Tesla wall connector network name and entering the 12-digit password on the quickstart guide, then this is not an error message. Simply continue with the setup process until you finish.
It is only when you see “No Internet Connection” after connecting to your home WIFi on the browser, that you know that there is an issue. In that case, try the fixes described above to resolve the problem
thank you thank you thank you for posting this. it took some digging to find you but your instructions worked once I went into airplane mode.